If like me, you have an electronic drum kit permanently set up at home, over time you’ll probably feel like expanding it and adding more pads. More things to hit are better, right? Unfortunately, unlike our acoustic-drumming counterparts, expanding an electronic drum kit isn’t as easy as simply mounting a new drum or cymbal and putting it in place – you need enough inputs.
The problem is, eDrum manufacturers can be quite stingy with providing inputs. Unless you own a flagship kit, you might only be able to add one or two extra pads on top of what your kit came equipped with. Fortunately, you don’t have to go out and buy a new drum module, there is another way – by using a drum splitter cable.
In this guide, we’ll look at what drum splitter cables are, how they work, the pros and cons to be aware of, and how to set yours up.
What are drum splitter cables?
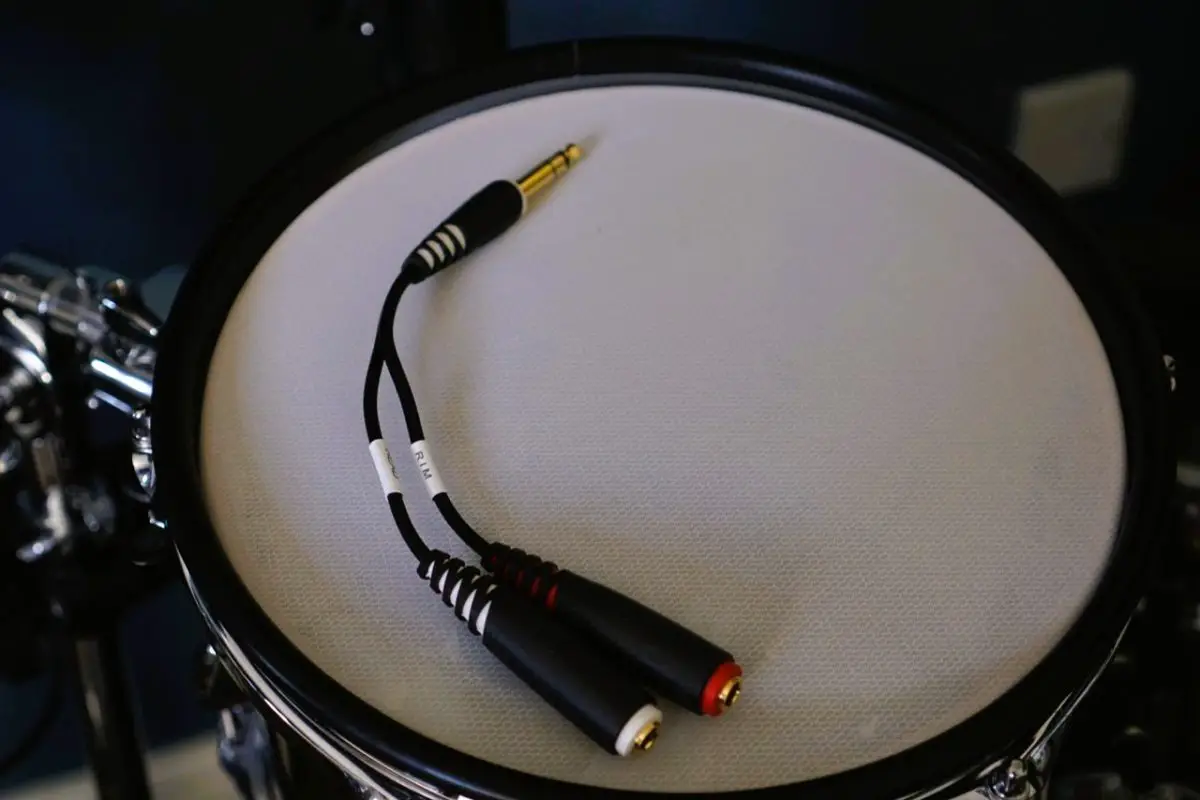
Drum splitter cables take a stereo drum module input, designed for a drum pad with a head and rim, or cymbal with a bow and edge zone, and separate those out into two separate mono inputs.
That means you can now plug in two drum pads or two cymbal pads into that one socket on your module, and assign different sounds to each. But be aware – there are some limitations beyond only having one zone per pad – read on to learn more.
How do drum splitters work?
Drum splitters do not simply stereo-to-mono adaptors, nor are they like headphone splitter cables. To ensure any drum pads that you plug in register correctly, drum splitters have a resister in their circuitry. Aside from this, they are relatively simple – you can even build your own if you are handy with a soldering iron, by following this guide at Vdrum Tips.
Types of drum splitter cables
You can get drum splitters incorporated into cables or boxes. Below are links to all the drum splitters I’ve found on the market. If there’s any I’ve missed, let me know in the comments!
Splitter cables
Drum splitters first became available as cables. There are two types, based on whether the jack on the module end is male or female.
If you have a drum module that uses a cable harness, such as a low or mid-range Roland TD-11, 17, or 27, then you need to use a splitter cable with a ‘female’ input, to ensure you can plug it into the cable harness. Here are a few options to consider:
- Drumsplitters – Female Drumsplitter Cable for Roland
- Drum-tec – eDrum splitter stereo jack to 2x mono
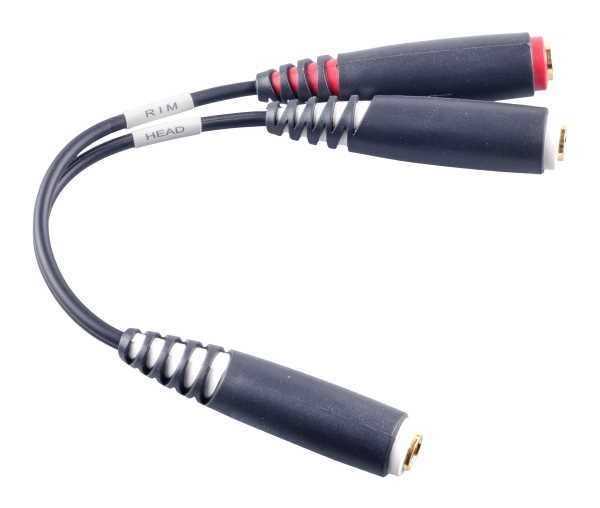
Alternatively, if you have a module that has sockets built-in, such as a higher-end TD-12, 20, 30 or 50, then you’ll need a splitter with a ‘male’ input, allowing you to plug the splitter directly into your module. Here are some products to consider:
- Drumsplitters – Male drumsplitter cable for Roland
- Drum-tec – eDrum splitter stereo plug to 2x mono
I own the Drum-tec version of the splitter cable and will use this for the guide below.
Splitter boxes
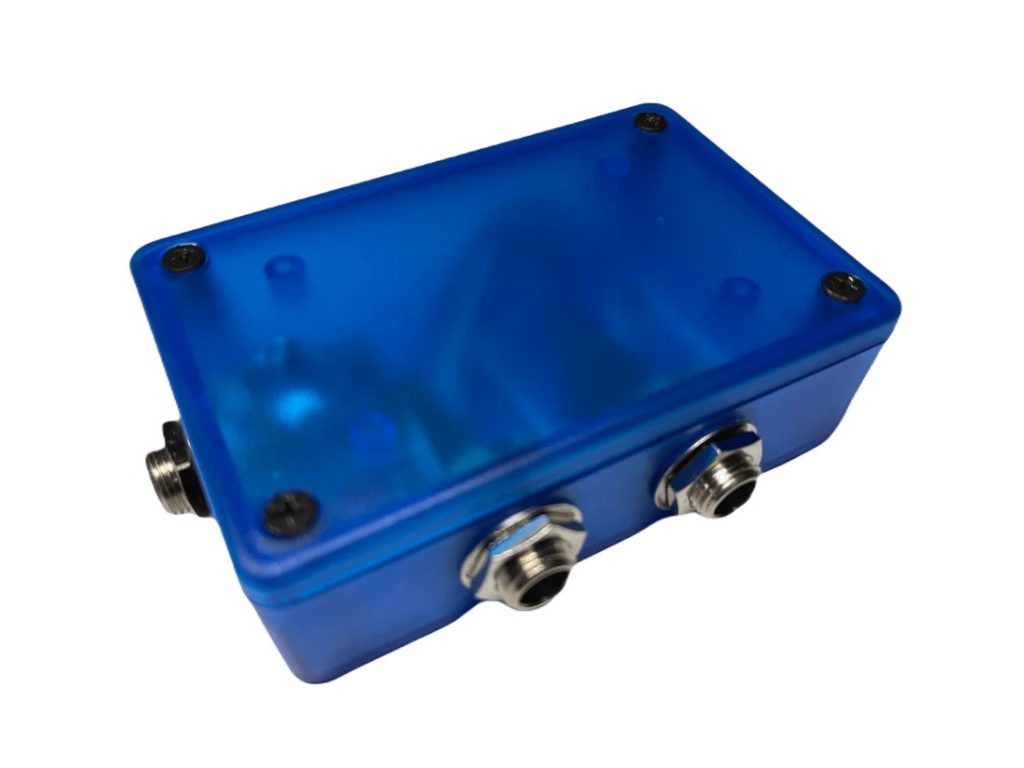
Alternatively, you can buy splitters in a box format – the Drumsplitter Jambox. This requires an input TRS cable from the module and two further TRS cables to your drum pads. This could be a good option for drummers with larger kits, as it can give you a bit of extra cable length to position your pads.
Cable management boxes
I have only found one product that falls into this category, which is the TD breakout box by Drone Trigger. This is a small, DIY builder selling splitter cables and the TD breakout box on their eBay store, Kittoys.
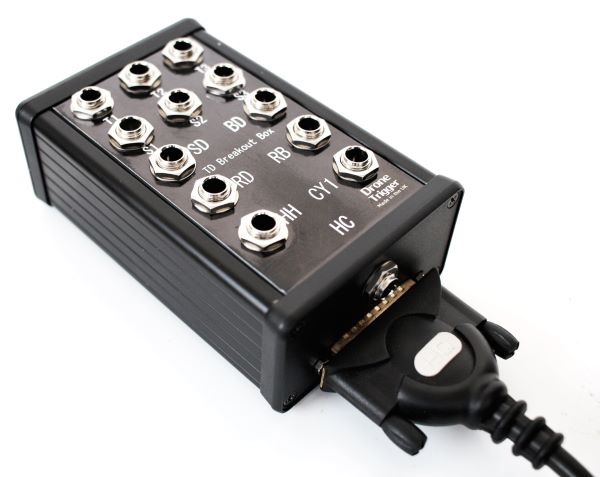
The TD breakout box replaces the standard cable harness on lower-to-mid-range Roland kits, replacing it with a breakout box for better cable management. The secret feature of this box is the built-in drum splitter on all the tom inputs. When you plug in a single tom into the stereo input, it works normally, but by plugging in a second pad, each input can be split into two mono inputs.
I recently bought one of these boxes for the cable management benefits, and the built-in splitter works well. As these are handmade products, they are not always in stock or listed, so if you want one save their eBay store page as a favourite and return regularly.
Disclosure: as an eBay affiliate, we may receive a small commission that helps us maintain the site if you follow the above link and purchase anything from eBay within 24 hours, at no additional cost to you.
What drum modules work with drum splitter cables?
Compatible modules
Drum splitter cables are only designed to work with Roland modules. That’s because other drum modules, Yamaha in particular, use a different wiring system. Other modules that use the same wiring system as Roland may work, though do so at your own risk.
Incompatible modules
Unfortunately, there are some Roland modules that don’t work with drum splitter cables. Below is all the information I could find on these kits:
- TD-25: Not compatible due to the module not allowing users to select different head and rim sounds – both need to be assigned to the same instrument. However, if you trigger a VST drum library, you may be able to use a splitter and assign different instruments to the separate midi notes
- TD-3, TD-4, TD-10: These old modules are technically compatible but only on the snare input, which means the cross-stick sound is lost
- TD-5, TD-7: These old modules are not compatible with drum splitter cables
What are the pros and cons?
A reminder of the benefits:
- You can plug in more inputs – think extra splash cymbals, extra crashes or chinas, additional toms or other effects
- You don’t need to buy a new module, assuming you already own a reasonably modern Roland kit
But there are some downsides:
- Split pads will be mono only: For drums, that means you can’t assign a different sound to the rim, for cymbals, that means no separate bow and edge sounds
- Cymbal chokes will not work if you split a cymbal pad
- The pad assigned to the rim won’t be as sensitive as the one assigned to the head, though it’s very marginal
- The module thinks you still have one pad attached, not two. That means you should ideally plug two of the same pads into a split input think two cymbals OR two drums, ideally identical pads, though different pads can work with a bit of tweaking
- You can’t play both the split pads at the same time, so you’re likely best splitting pads that you’ll tend to strike infrequently
- “Crosstalk” can sometimes be an issue, it can be eliminated but adds complexity to the pad set-up. See the setup section below for more information
What pads work with drum splitter cables?
During my research before I bought my first Drum-tec splitter cable, I found conflicting information about this on forums. Some resources claimed that splitters don’t work on cymbal pads, though I’ve tested this on two Roland CY-12C pads, as well as my Lemon 15-inch china. In fact, I currently split a CY-12C and the Lemon china via the TD breakout box and this works fine.
How to set up your drum module
Setting up a drum splitter is a bit more complex than dialling in a single pad to a drum module, as you’re effectively juggling two drums on the same input.
Below is a quick walkthrough of how I set up my splitter cable, up to the point of assigning pad sounds, which can be done either via your module’s onboard sounds or via midi if you use your drum module to trigger a VST drum library.
To make things easier, you could set the bow and edge or rim and edge zones of your pads to different sounds before you start, either in your module or via a VST, which makes setting up your pads slightly easier. That’s because you’ll have audible feedback on how the pads are triggering, instead of having to rely solely on the icon on your module’s screen.
Now you can plug your pads into the module via the splitter cable.
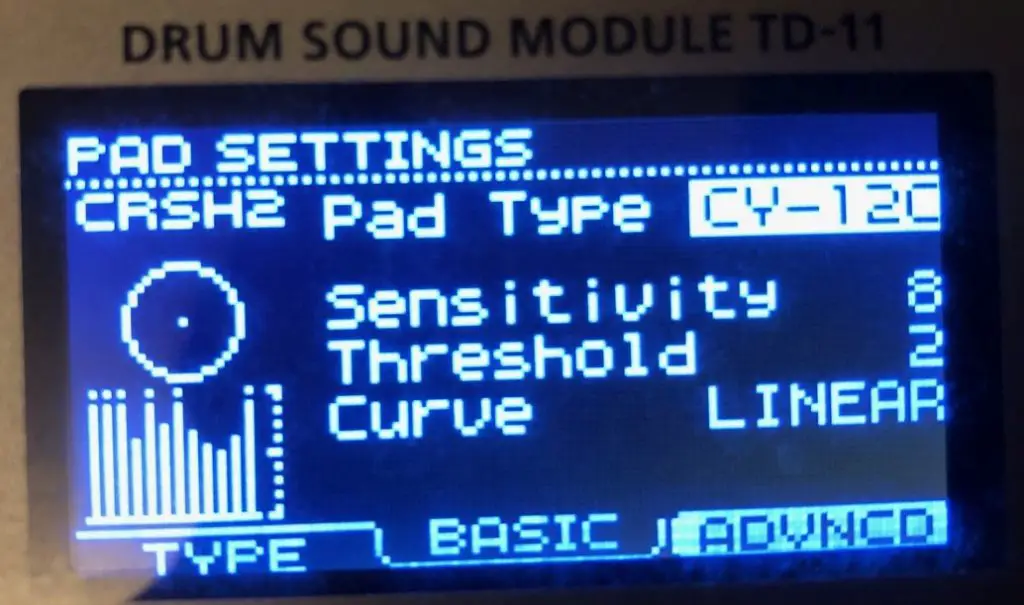
Next, you need to navigate to your module’s settings screen, then the pad settings screen, and specify what pad you’ve attached. Remember, the module will only identify one drum on the input, and it’s recommended that you use the same pad for each input or at least the same type. Mixing cymbal and drum pads could lead to unpredictable results.
I have seen other guides online that suggest you can only set the pad type to a PD-125 or PDX-8 for this to work, but in my experience, this is not the case when using cymbals. I have split two CY-12C pads on the same input and used the CY-12C setting in the module as a starting point, with no issues. So my advice is to match the pad setting to the type of pad you’re using, only changing if you can’t get the results you’re looking for.
The next step is to get your pad assigned to the head zone to trigger correctly. It’s best to start with the head because the head sensitivity setting influences the rim gain setting that adjusts the sensitivity on the other pad. Set the head sensitivity so that your hardest hit on the drum peaks the velocity meter on the drum module. Test that you can still play lower dynamics by watching the meter as you play.
Next, play the head very lightly, and gradually dial up the threshold setting until your lightest hit is no longer detected, then bring the setting back down very slightly so it gets picked up again. The threshold setting is used as a compromise between sensitivity and preventing “crosstalk” which is when your pad is falsely triggered by other pads. This can be an issue when using a splitter cable, particularly if your pad is mounted on a rack.
If you’re experiencing crosstalk, dial up the threshold slightly to try and minimise it. Some modules will also have an “Xtalk Cancel” setting. You can dial this up slightly on the pad that is being inadvertently triggered to help minimise it. But beware – if the Xtalk Cancel setting is too high, it can occasionally cause other triggering issues. Like most things, adjusting you’ll need to find a compromise with these settings.
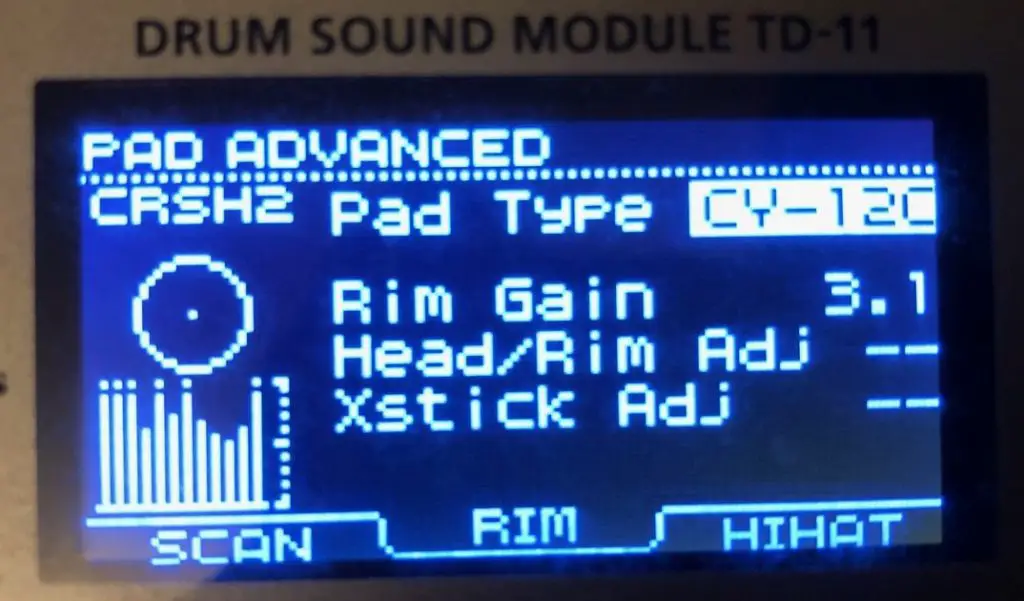
The next step is to dial in the rimshot adjust and rim gain settings so that the pad set to the rim input triggers correctly.
Starting with the rimshot adjust setting on 0, you should find there’s no rim sound at all, but the head sound will trigger. Gradually increase the rimshot adjust setting while hitting the rim input pad until the pad consistently triggers the sound you’ve assigned to the rim input.
Next, test the head pad and ensure it still plays the correct sound. If you bring the rimshot adjust setting up too much, then the rim sound will play on the head input.
You should now have the two sounds triggering on the correct pad, but the velocity might not sound quite right. To address this, check the velocity meter on your module while adjusting the rim gain. This should be adjusted until your hardest hit on the rim pad peaks the velocity meter.
While doing this, test the head pad. If the response of that pad is inconsistent despite striking it at the same strength, gradually increase the scan time value until it triggers consistently.
Finally, if you’re using a drum pad and not a cymbal pad, you might need to dial up the mask time to avoid double triggering.
When you’re done, play every other pad on the kit, especially other pads that are near your new split pads, especially those mounted to the same stand or rack, checking if any other pads are being triggered, by listening, or looking at the module screen when in the pad settings section.
I use Superior Drummer 3 which use useful for this step, as the pad icons in the software light up when triggered so it’s easy to tell if any pad is triggered inadvertently.
Be warned: even if you didn’t experience any cross-talk issues prior to using a splitter cable, you might find issues appear afterwards. I added a splitter for a CY-12C cymbal pad mounted on my drum rack, and found the other crash and rack tom mounted near to this cymbal started becoming susceptible to cross-talk while playing the split cymbal. This never happened prior to using the splitter cable, but fortunately, I was able to use the Xtalk cancel setting to eliminate it.
Below are some screenshots of the settings I used for a pair of CY-12C cymbals I split with the drum-tec splitter cable, so you could try the same settings as a starting point!

Wrapping up
Splitter cables are an inexpensive way to add more pads to your electronic drum kit, without needing to invest in a new drum module. But beware of the limitations of only being able to use one zone per pad, the inability to play both split pads at the same time and the slightly complex set-up required to eliminate cross-talk with other pads.
Do you use a splitter cable in your eDrum set-up? Have any advice on how to set them up and use them effectively? Share your thoughts in the comments below!
This article contains affiliate links. If you purchase a product through certain links on our site, we may earn a small affiliate commission. Learn more about our adverts and why you can trust eDrumHub here.

How to convert an acoustic drum kit to electronic

Should you buy a used electronic drum kit?
How to Choose the Best Mesh Drum Heads