
A big trend in drumming at the moment is the availability of electronic drums that look like acoustic drums, such as the ATV aDrums or Roland VAD series. But did you know you can convert an acoustic drum kit to an electronic one yourself, without needing specialist knowledge? This can save you money as well as provide you with an eDrum kit that fits your specific needs better. Read on to learn how you can build your own DIY eDrums!
Why you might want to build a DIY electronic drum kit
When I built my first electronic drum kit in 2016, I did so as there were no major drum companies selling electronic drums based on acoustic shells. This was before the launch of the ATV aDrums and later, the Roland VAD series, which look just like ‘real’ drums!
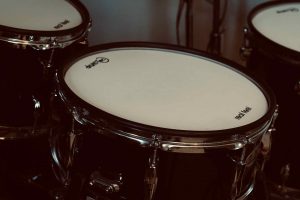
For me, the most important thing was to replicate an acoustic drum kit as closely as possible, and crucially to have pads that were closer in diameter to a typical acoustic kit, to enhance playability and make switching between playing acoustic and electric kits easier.
These days, acoustic-sized electronic drums are available, but usually at a premium to a ‘standard’ electronic drum kit. Saving money may therefore be an excellent reason to convert an acoustic kit to electronic – also known as A to E conversion – especially if you already have some acoustic drum shells that aren’t used and could become a practice tool for playing the drums more quietly at home.
Another reason why you might consider converting acoustic drums to electronic is if the ‘acoustic-style’ eDrums on the market don’t have a look you’re after. Both the Roland VAD 500 series and ATV aDrums come in black only, while converting an acoustic shell pack gives you many more options – you can take your pick of almost any drum kit on the market!
Basic A to E conversion Parts list
Because an A to E conversion can be configured in almost limitless ways, we’ve provided two parts lists below. The first is a generic list of everything you need to factor in, and the second is an example list of specific products you might want to consider.
- Acoustic drum shells
- Triggers for each drum
- Mesh heads for each drum (2 or 3-ply)
- Rubber rim protectors for all drums except bass
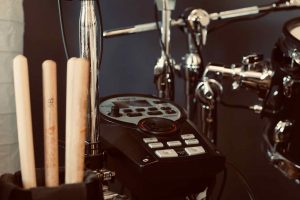
- Drum module
- Cymbal pads – hi-hat, crash, ride
- Cymbal stands and tom mounts
- Hi-hat stand, bass pedal and stool
Example parts list
Here’s an example list of parts with prices to give you an idea of how much it might cost to convert acoustic drums to electronic ones. This build is designed to be cheaper than the Roland VAD 500 series and aDrums while offering a similar look and feel.
Note that a mix of currency is used below to serve as a ballpark cost. The Guitar Center links below are affiliate links. If you purchase a product after clicking these links, we may earn a small commission which helps with the upkeep of the site.
- Roland TD-17 Module – £579 / $799.99
- Lemon Cymbals 13” Hi-Hat & 18” Ride set – $119 + $104 shipping
- Lemon Cymbals 13”, 15”, 18” Crash/Ride set – $129 + $104 shipping
- Triggera Intrigg set – €139 for 4 or €169 for 5
- Drumtec Design Series mesh heads (fusion set) – €159
- Drum shells – £300-500 or $350-650
- Drum rim protectors – $51 for 4
Related: Check out our reviews of the Lemon 18-inch ride and 15-inch china cymbal pads
The eDrum-specific items above come to $1550, leaving you with a choice of shell pack based on your specific requirements or taste. If you opt for a 5-piece kit you’ll also have one cymbal spare, so more money can be saved by choosing a be-bop style acoustic shell pack, which tend to come in a 4-piece configuration and are generally cheaper, also saving money slightly by requiring smaller mesh heads.
Smaller-sized drum shells can also look a bit better alongside electronic cymbals, which are generally smaller than acoustic ones. Additionally, a smaller bass drum tends to feel better to play, as larger bass drums will be more bouncy. For all bass drums, it’s a good idea to stuff them completely with pillows to help reduce bounce without affecting trigger response.
From this basic parts list, you can also upgrade or downgrade parts based on your needs. If you’d prefer to upgrade to Roland cymbals, then our tip is to buy a full electronic drum kit such as the TD-17KVX or TD-27KV. These bundles work out to be much better value – you may find buying a bundle is the same price or only slightly more than buying the pads you need individually, and you can recoup even more costs by selling the pads you don’t need on eBay.
Related: Check out our review of the Roland TD-17 here!
Build steps – trigger installation
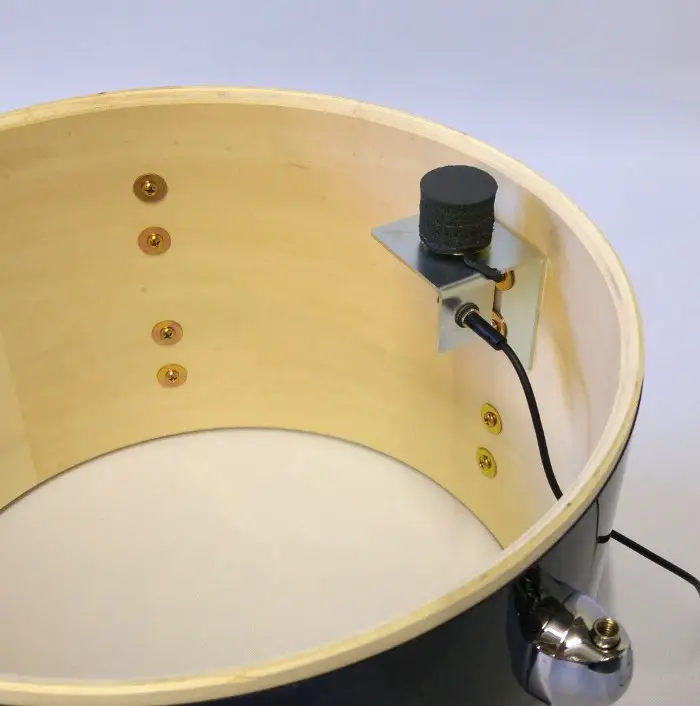
- Disassemble your drum shells and pick a lug where you’d like your internal trigger to be mounted
- If you’re using a side-mounted trigger such as the Triggera Intrigg, pick a spot that you’re unlikely to strike with your stick. The best place is to position the trigger at the bottom rim closest to you in a playing position, as you’d never play here intentionally.
- Loosen the lug so that the trigger mount can slip in. Position the trigger so that the foam cone is 2-3 mm higher than the drum rim when looking at it directly side-on. This creates slight pressure on the trigger cone which helps ensure the drum will be sensitive enough to your playing
- Tighten the lug screw against the shell so the trigger is in place and cannot move
- Repeat for all your drums
- Apply the rim protectors – these might seem optional but are definitely a good idea to avoid chipped drumsticks chewing up your cymbal pads and mesh heads
Build steps – bass drum
If you’re using a mesh head, repeat steps 1-4 steps above. The only additional step is to stuff the drum with some pillows so it is completely full. This greatly reduces the bouncy feel
Module tuning/pad set-up
If you already have an electronic drumset, you’ll know it will include presets for the pads sold by the manufacturer. If you have a Roland module, for example, you can easily select the settings for any pad they make that the module is compatible with.
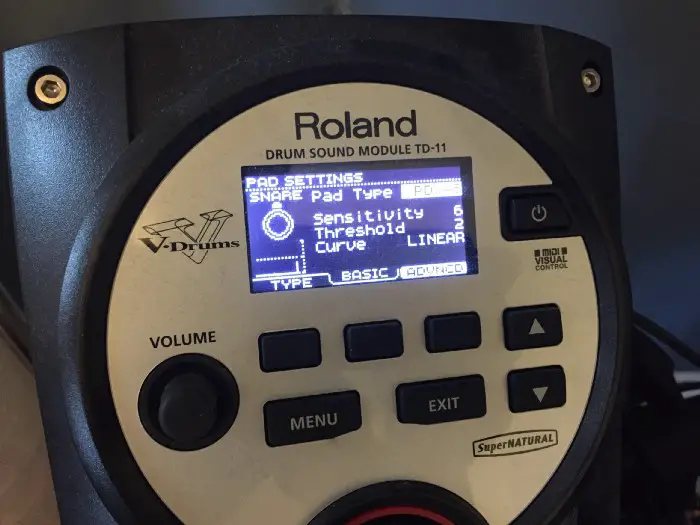
As you’ve just constructed a set of DIY eDrum pads, you’ll need to dial in your own settings for each pad. It sounds complex, but it really isn’t!
To start with, select an existing pad in your module that resembles your DIY pad as closely as possible. As this guide uses side-mounted triggers, we’ll start with the largest Roland pad that also has a side-mounted trigger – the PDX-12 or PDX-10, depending on what your module has a preset for.
Once you have this, adjust the sensitivity to suit you. Using the graphic on the module screen, check that the drum picks up the full dynamic range, from the lightest strokes to not topping out before you reach full power.
From there, adjust the rim sensitivity (which might be labelled as head/rim adjust on some modules) setting so you can trigger rim clicks.
For me, this was all I needed to do to get my DIY eDrums triggering correctly, but if you experience issues, there are other settings that can help:
Mask time: This is a setting to eliminate double triggering, which can be an issue on bass drums. As you adjust, play the bass drum listening for any accidental double triggering (and check the graphic onscreen)
X-stick threshold: To adjust the threshold between triggering a cross-stick (rim click) vs a rim shot
X-talk: To eliminate any crosstalk issues, where hitting a pad might trigger a different pad (typically only if two pads are mounted on the same stand)
You can find a comprehensive guide to more advanced troubleshooting and drum pad tuning over at VDrums.com, which is worth a read in the unlikely event you have issues with your set-up. Lastly, if you really are struggling, consider dismantling your drums and reconsider the trigger placement, for example bringing it closer or further from the head, depending on if the sensitivity is too low or too high.
Tips on choosing parts
Mesh drum heads
Mesh drum heads come in 1, 2 or 3-ply versions. Single-ply heads are best avoided, they are extremely bouncy and don’t feel at all like real drums. 2 or 3-ply heads are a far better choice and are used on commercially available eDrums. Roland uses 2-ply heads on the vast majority of their drum pads, while their digital snare uses 3-ply.
These thicker drum heads control the bouncing a lot more and feel much closer to real drums. They are still more bouncy than normal acoustic heads, but the closest you can get to real heads currently. Our tip is to use lighter drumsticks on your eDrums – read our guide on the best drumsticks for eDrums for more information.
Should you use mesh bottom heads?
Using mesh heads on the bottom of your converted eDrums is not essential. However, they do reduce the volume slightly, compared to using a regular drum head on the bottom. With a standard head, you will get a bit of tone out of the drum if there’s a bit of tension in the head. With a mesh head, you would hear any additional sound. Our recommendation would be to choose cheap single-ply heads for your bottom heads so your drums will be as quiet as possible while not breaking the bank.
Roland vs Yamaha cymbal pads
It’s very important to use cymbal pads that are designed to work with your chosen drum module. The easiest way to do this is to buy cymbals from the same manufacturer as your module. Alternatively, if you opt for third-party cymbals, be sure to verify they are designed to work with your module.
An important thing to know is that Yamaha electronic cymbals are wired up differently from Roland ones, meaning if you plug a Yamaha cymbal into a Roland module, you might get unexpected results, such as the wrong sound playing on the edge, bell or bow areas. Hi-hats are even more complex as they work in a completely different way and require an adaptor to work.
The main compatibility issues are with Yamaha pads vs everything else. Other brands like ATV or EFnote were actually founded by ex-Roland employees, and a byproduct is their products tend to work well with Roland modules.
Finally, remember that if you use a third-party (but compatible) pad then your module will not have a specific preset for it, so it’s important to refer back to the module tuning section of this guide for the best-triggering performance.
Lemon cymbal pads
We’ve picked these for our build list due to the low cost and great performance. We’ve tested their 18-inch ride and 15-inch china and used them for over 6 months at the time of writing, and think they are a great option at an unbelievable price.
However, if you’re speccing a higher-end Roland module like a TD-27, we’d recommend going with their digital ride and digital hi-hat (if you can stomach the cost of the latter!) for their top-of-the-range triggering response.
Make your A to E conversion sound even better
The built-in drum sounds in most drum modules typically don’t sound particularly amazing. A solution to this is to connect your drums to a Mac or PC and trigger a VST drum library, which uses real drum sounds in place of the often artificial-sounding module sounds. Learn more in our guides on how to make your eDrums sound real and the best modules for VST drum triggering.
This article contains affiliate links. If you purchase a product through certain links on our site, we may earn a small affiliate commission. Learn more about our adverts and why you can trust eDrumHub here.
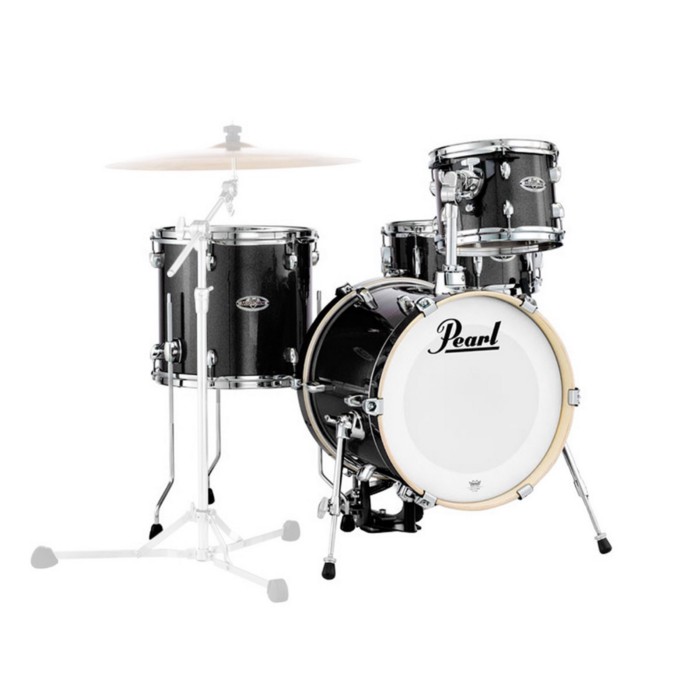
The Best Compact Drum Kits for A to E Drum Conversions
What is Positional Sensing on Electronic Drums?
Do Yamaha Pads Work With Roland Drum Modules?
