Do you want to build your own electronic drum pads, but don’t know where to start, or don’t have specialist equipment like a soldering iron or knowledge about electronics? Fortunately, that doesn’t mean you can’t build your own DIY drum pads. This guide will look at how you can assemble your own electronic drum pads using existing drum shells and dropping in pre-built drum triggers.
Of course, the purists out there may say that it’s not a DIY drum pad if you’ve not built the triggers from scratch. However, this guide is geared around the novice DIY drum enthusiast, who wants to make their own drum pads without having to spend lots of time troubleshooting and designing a bespoke solution. Using commercially available parts makes the process quicker and easier, so read on to find out how to do it!
What you need
The basic components of your DIY electronic drum pad are:
- A drum shell
- An internal electronic drum trigger
- An internal cable with TRS socket
- A mesh head for the top head
- A rim protector for the top head
- A mesh head for the bottom head
Below, we’ll look at a few factors to consider when choosing these parts, with links to specific products where relevant.
What about external drum triggers?
An ultra-basic approach to building your own electronic drum is to use an external drum trigger. These combine parts 2 and 3 in the above list, and are so simple to install that you don’t even need a screwdriver – just slip them on the drum hoop when you change the top head and screw in the tension rod. If you like the sound of this approach, one of the cheapest solutions is a set of DDrum Red Shot drum triggers. This set of five comes in at under the price of a single Roland equivalent – the RT-30H.
What are the downsides of this approach? These DDrum triggers are only single-zone, meaning they aren’t great for snares, but can be a good option for toms and bass drums where you either don’t need a rim zone or are unlikely to miss it. For a snare drum, you might want to try the Roland RT-30H dual zone external trigger instead.
The downside for all external triggers is that they don’t look as seamless as internal triggers do, so you’re essentially trading simplicity for aesthetics.
Choosing your drum shell
Almost any drum shell can be used for your DIY electronic drum pad, with a handful of exceptions. The most important thing is to know whether the drum is compatible with your drum trigger. For more detailed specifics on that, check the section below on triggers. But when it comes to the drum shell itself, there are a few general things to watch out for.
Firstly, ensure your drum is deep enough for the trigger you want to use to sit inside. That usually means avoiding shallow piccolo snares. Generally, anything deeper than 5 inches will be absolutely fine.
Secondly, check where the lug screws are, how many screws there are per lug, and how deep they are within the drum. Compare this with the internal triggers you want to use, and consider if they’re in the right position to allow them to be mounted at the correct depth within the drum. Usually, internal triggers have a level of adjustability so they can be used with a range of drums and lug screws. It’s a good idea to avoid vintage-style drums with single, double-ended lugs on all drums that use very long tuning rods to connect them to the drum heads. The lug screws on these sorts of drums are likely to be too far from the head to be able to mount the triggers.
Thirdly, be aware of certain types of metal snares which may not fit every single trigger out there. Some metal snare drums have a concave centre bead (a horizontal band on the snare to provide strength), which may get in the way of the internal trigger mounts. These sorts of snares need to be treated like piccolo drums, by ensuring the distance between the head and the centre bead is deep enough for your trigger to be mounted inside.
Types of internal drum trigger
There are three types of triggers: side-mounted, centre-mounted, and multi-sensor.
Side-mounted triggers are typically the cheapest of the three and best for drum modules that don’t support positional sensing. These triggers avoid “hot-spotting” or false triggering as they are mounted at the edge and away from areas that are typically played. It’s a good idea to mount these triggers at the edge of the drum closest to you, helping you to avoid hitting the trigger directly.
Related: Jobeky electronic drum side trigger review
Centre-mounted triggers, as the name suggests, mount the trigger directly in the middle of the drum, which enables positional sensing on modules that support it. Positional sensing allows different sound samples to trigger depending on how close to the centre the drum is played, which can help electronic snare drums to respond more like a real drum.
Unfortunately, the issue with these triggers is “hot-spotting”, which happens when you strike the drum directly on the trigger, playing the drum sample at full intensity, even if you played a very quiet, gentle drum stroke. As a result, some eDrummers prefer side-mounted triggers to avoid this, even if their module supports positional sensing.
Finally, multi-sensor setups are the most complex triggering solutions. They are typically found in high-end drums, such as those from ATV and EFnote, as well as the Roland Digital Snare. Some support positional sensing without the hot-spotting issue and generally provide improved sensing over single-trigger setups.
Unfortunately though, at the time of writing, I’ve not found any DIY products that offer this, but I am sure they are bound to appear on the market at some point. I will update this article if I become aware of any, and if you’ve found a DIY product that offers this, let me know in the comments!
Where can you buy internal drum triggers?
Internal drum triggers are mainly made by small businesses. Here are a few to consider:
- Jobeky Drums sells a range of dual-zone internal triggers including centre-mounted and side-mounted versions. I use their side triggers on my first eDrum conversion which have had no issues since I received them in 2016. Jobeky is based in the UK but ships around the world, though delivery can be slow as products are made-to-order.
- Triggera makes the Intrigg dual zone side-mounted trigger which is very similar to the Jobeky side trigger. The main difference is an externally mounted connector which requires a ½-inch air vent, so be sure to check your drums have this before purchasing.
About rim protectors
Rim protectors are rubber sleeves that cover your drum’s metal rims, protecting your drumsticks from chips and breaks. Rim protectors significantly extend the life of your drumsticks – I’ve never broken a drumstick on an electronic kit in over 10 years of ownership. When it comes to playing, rim protectors help to lower the volume of playing cross-stick and rimshots, helping you to hear more of your module’s drum sounds through your amp or headphones.
You can buy drum rim protectors from the following sites:
How to choose a mesh batter head
Mesh drum heads come in one, two, or three-ply variants. When it comes to batter heads, you should only consider two or three-ply versions, as one-ply heads tend to be extremely springy, which are far removed from the playing feel of real acoustic drum heads.
Two and three-ply heads get closer, so how do you choose between the two types? Two-ply heads are marginally springier than their triple-ply counterparts, but make up for this by usually being slightly quieter to play and are typically a bit cheaper.
My preferred heads are the DrumTec Real Feel range, which are premium three-ply mesh heads. I’ve used them for around two years now and find them to be very durable. Aside from a few faint stick marks on my snare head, they are in good condition after regular use and I fully expect to get years of life out of them.
Other sites that sell mesh drum heads include:
Learn more in my guide to the best mesh drum heads.
Note: Some links on this page are affiliate links. If you choose to buy a product after clicking these links, we may receive a small commission at no extra cost to you, which goes into maintaining this site.
Choosing a bottom head
Your drum’s bottom or resonant head is not designed to be played, so a premium mesh head is not necessary. You can technically use either a mesh or standard acoustic drum head on the resonant head – here’s how to choose.
If you are on a budget and already have a set of acoustic heads, for example, ones that came with your kit, they are fine to use as bottom heads. However, acoustic heads on the bottom do add a bit of extra noise as they will resonate a little when the mesh batter head is struck, though it can be mitigated by detuning the resonant head.
A quieter option is to use a single-ply mesh head, which creates no additional sound when the batter head is played.
Assembling your electronic drum pad
Putting together your drum pad is very simple:
- Remove both acoustic heads from your drum
- Identify which lugs you need to unscrew to mount your internal drum trigger
- Place your trigger in the drum and partially tighten each lug screw so that the trigger is in place but can be moved up or down if needed
- Align the trigger so the tip is 1-2mm above the bearing edge of the drum, based on your particular trigger’s instructions
- Fully tighten the lug screws so the trigger is firmly in place
- Stick the rim piezo to the drum shell, if your trigger comes with one
- Connect the trigger sensor cables to the 6.3mm jack, and mount via the drum’s vent hole, or feed the cable through the vent hole if your jack is mounted in a different way.
- Seat your batter head as if it was a standard drum head and replace the rim. Tighten each tension rod until the head is tight
- Repeat for the bottom head
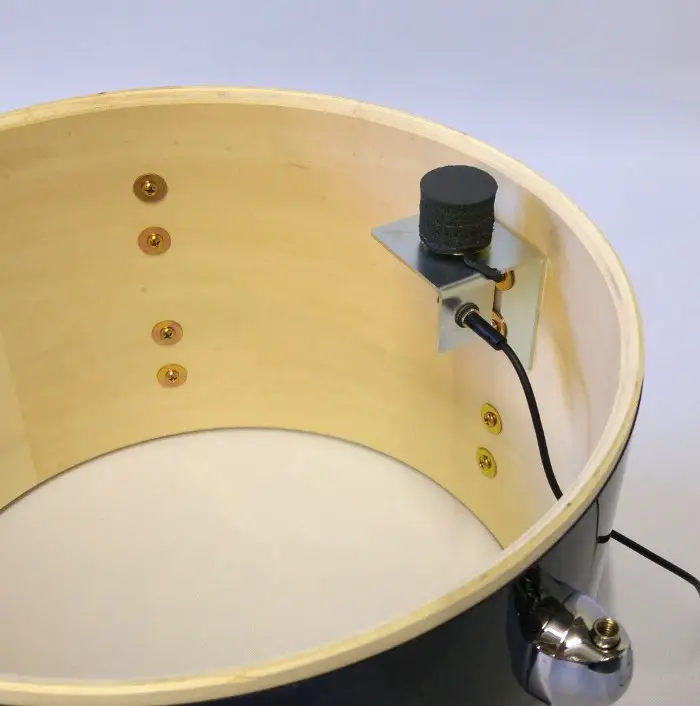
Below you can see how I set up my Jobeky side trigger – your steps will vary slightly depending on the drum trigger you’ve chosen.
After that, you’ll need to set up your pad manually with your drum module. The best place to start is by using a drum preset that is similar to the one you’ve built, for example, if you’re using a side trigger and have a Roland module, then you could use a PDX-12 or PDX-10 preset as a starting point. If you’re using a centre-mounted trigger, then you can start with a PDA-120 preset.
From there, you’ll need to adjust the sensitivity and rim gain to suit, using the graphics on your module screen to ensure the full dynamic range from a gentle hit to a powerful strike is detected. Learn more in the module tuning section of our A-to-E conversion guide.
Should you make your own DIY Electronic Drum Pads?
Building your own drum pads needn’t be difficult – if you’re happy to buy a drop-in drum trigger, then it’s almost as easy as changing a drum head, and dialling in the settings on your module is no different to buying an aftermarket cymbal or pad such as the Lemon ride or electronic China cymbal. The result can be a kit that’s truly unique, can compete with the best eDrums from Roland, complete with your choice of drum shells and finish. Plus, there’s the chance to save a bit of cash compared to the latest V.A.D series drums or the TD-27 from Roland!
This article contains affiliate links. If you purchase a product through certain links on our site, we may earn a small affiliate commission. Learn more about our adverts and why you can trust eDrumHub here.

What is a Hybrid Drum Kit?

Is it Better to Learn Drums or Guitar?

Electronic drums that look acoustic – Roundup
